Angularjs2教程:英雄之途

转摘请说明出处!

译者自序:仅是自己学习的时候顺便翻译下,仅当做笔记加深印象之用,并未对所翻译内容进行过复查和校对,应该会有大量狗屁不通的地方,建议还是看官方原文

Tour of Heroes教程一步一步教大家如何用TypeScript写Angular应用.*

介绍

英雄之旅:预览

我们更大的计划是创建一个应用,帮助人员管理机构来管理英雄们,即使是英雄他也需要有一份工作.

当然本教程会进一步深入使用Angular来构建应用.在一个成熟的,数据驱动的应用中我们需要购将非常多的功能:获取和展示英雄列表,编辑选中的英雄细节,英雄数据视图导航等.

英雄之旅覆盖了Angular的核心功能,我们使用内置指令显示/隐藏元素并展示英雄数据列表.我们创建一个组件用于展示英雄细节,另外一个组件用于显示所有的英雄列表.我们增加一个可编辑字段通过双向数据绑定的形式更新model.我们将组件的方法绑定到用户事件上,如键盘敲击或者鼠标点击.我们将学习如何从主列表内选择英雄并在细节视图里编辑他.我们通过pipes格式化数据.我们将会创建一个共享服务来收集我们的英雄.我们将使用路由功能来实现不同视图和组件之间的导航.

我们将会接触到足够多的Angular的核心功能,我们会发现Angular很强大几乎可以用来实现任何的应用.
在线示例

最终效果

这是这个应用的最终效果,从仪表盘可以浏览我们的主要应用:
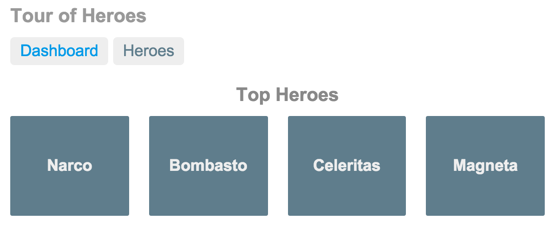
仪表盘上面有两个链接(“Dashboard”和”英雄们”).我们可以通过点击它们导航到这个仪表盘和英雄视图中.

我们点击仪表盘上的名为”Magneta”的英雄,会有这个英雄的细节展示,并且我们可以修改英雄的名字.
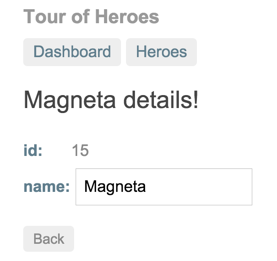
点击”Back”按键,我们可以返回”Dashboard”.顶部的导航栏可以带我们进入任一一个主要视图.我们点击”Heroes”,应用就会展示英雄们的列表视图.
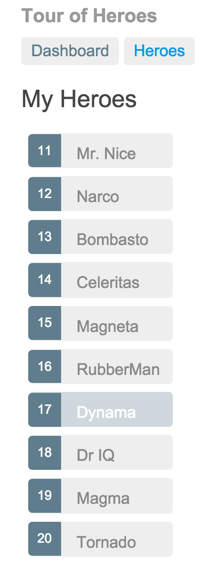
我们点击不同的英雄,会有一个可读的小细节展示到我们的点击处.

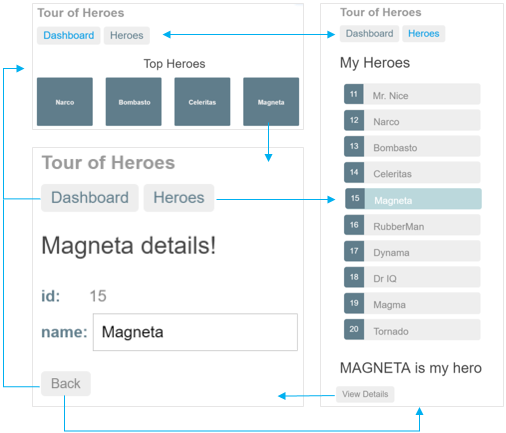
下图列出了我们导航栏的选择流程图:
以下是APP的动画效果:
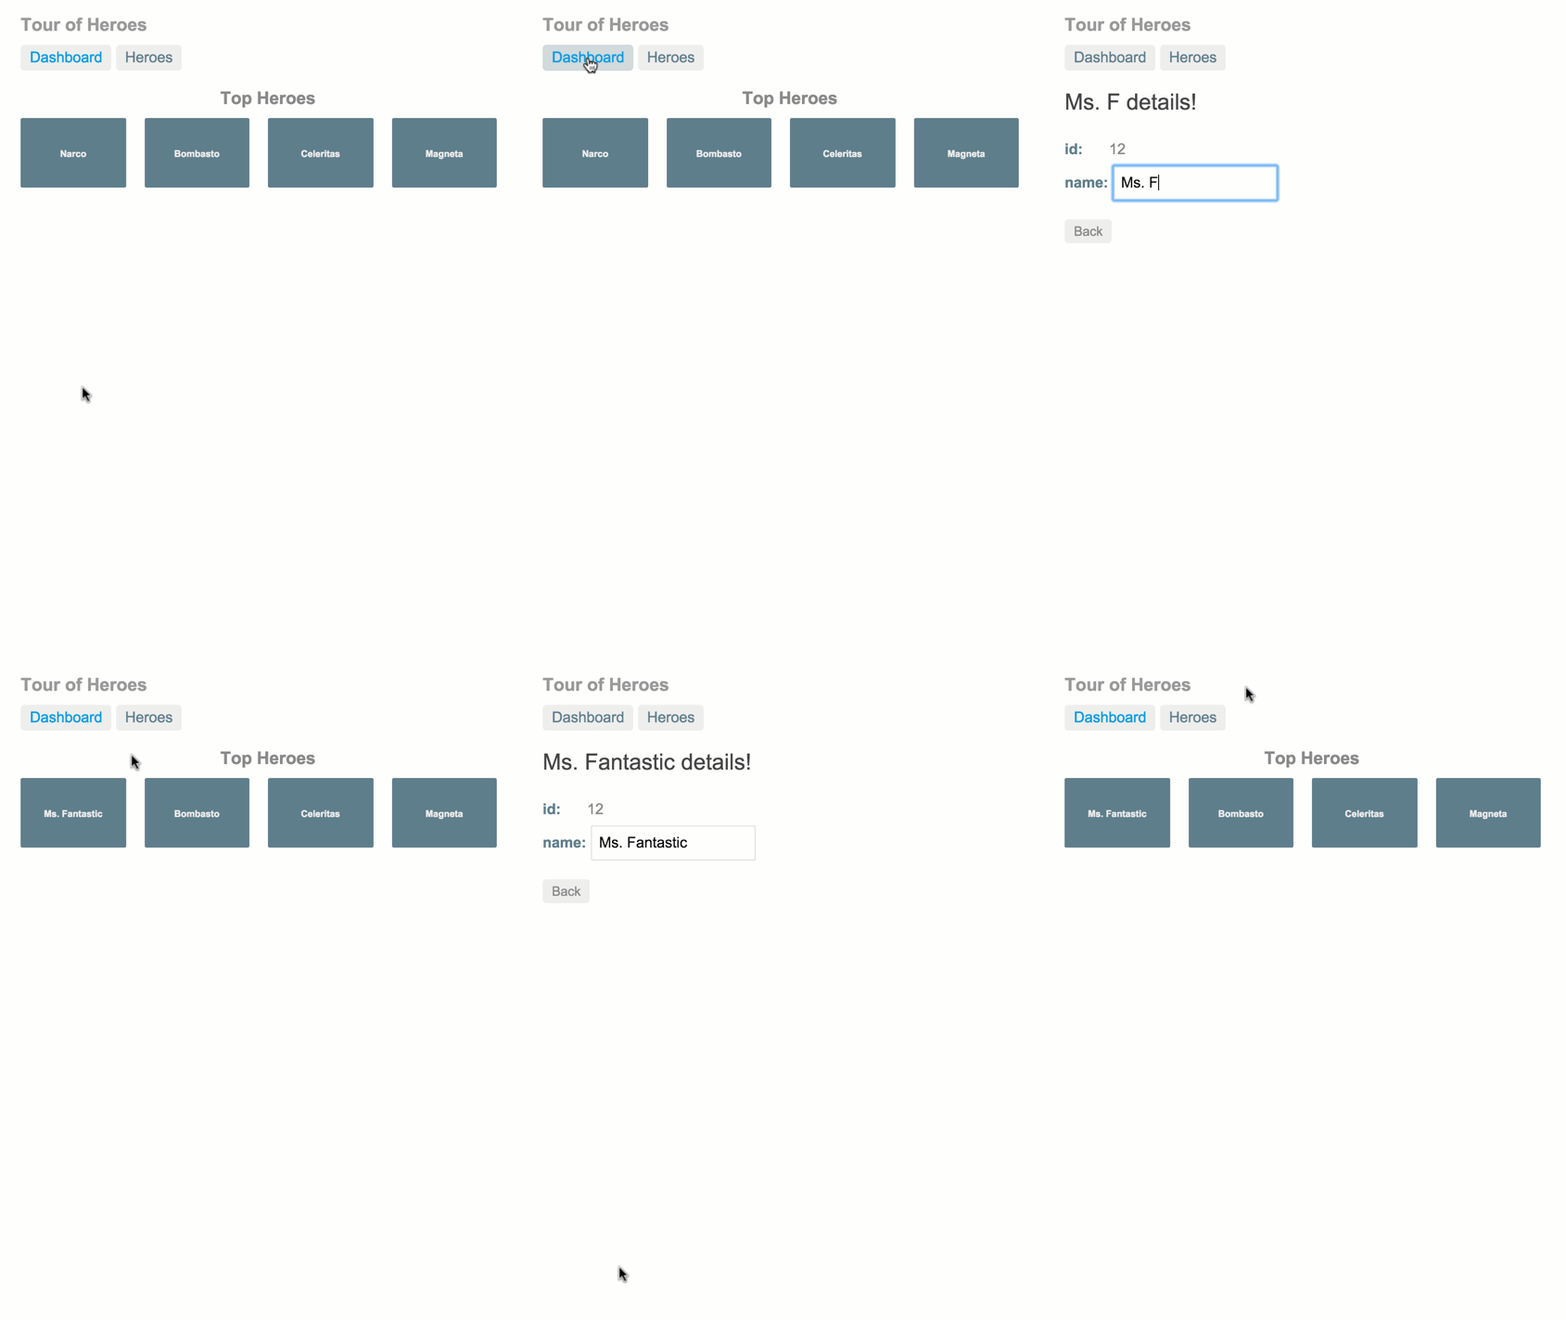
下一步

我们开始一步步构建英雄之旅这个应用了,我们每一步都是为了解决应用中某个需求为目的的.我们一起来见识下Angular非常多的核心功能.

英雄编辑器

从前…

每一个故事都得从某一个时间开始,我们的故事从QuickStart教程介绍开始.

运行教程这部分的示例: live example

创建一个名为angular2-tour-of-heroes的文件夹,并跟着快速入门教程进行工程的预配置和安装.

你也可以直接下载快速入门源码

最终结构如下:
我们最终的工程文件结构如下:

1
2
3
4
5
6
7
8
9
10
11
12
13
14
15
16
17
18
19
20
21
22
23
--angular2-quickstart

----app

------app.component.ts

------main.ts

----node_modules ...

----typings ...

----index.html

----package.json

----styles.css

----systemjs.config.js

----tsconfig.json

----typings.json

保持app在线编译和运行

实时监控文件改变,编译TypeScript并更新app,我们只需:

npm start

这个命令运行编译器的观察模式,启动服务,在浏览器里打开应用,并维持app持续构建和运行.

英雄展示

我们想在APP里显示英雄.让我们增加两个特性到AppComponent, title表示应用的名字,hero赋值一个英雄,名为Windstorm.

1
2
3
4
export class AppComponent {
title = 'Tour of Heroes';
hero = 'Windstorm';
}

更新@component装饰器里的模板,将数据绑定到新的特性里.

1
template: '<h1>{{title}}</h1><h2>{{hero}} details!</h2>'

此时浏览器应该会刷新并显示title和英雄名.

双大括号表示读取和渲染组件内的titlehero特性,这是单向数据绑定的”插值”形式.

关于’插值’更详细的信息请查看 数据展示章节

英雄对象

现在,我们的英雄就只有一个名字而已,我们想要更多的特性,我们需要把它转换成类.

创建一个带有idname特性的Hero类,暂时放到app.component.ts文件里,import语句之下.

1
2
3
4
export class Hero {
id: number;
name: string;
}

现在我们有了Hero类,让我们重构下hero特性:

1
2
3
4
hero: Hero = {
id:1,
hero:'Windstorm'
};

hero特性从字符串变成了类,修改模板里的对应字段:

1
template: '<h1>{{title}}</h1><h2>{{hero.name}} details</h2>'

修改HTML模板

我们现在需要显示更多的信息,不仅仅是名字,修改下html模板:

1
2
3
4
5
6
template:`
<h1>{{title}}</h1>
<h2>{{hero.name}} details!</h2>
<div><label>id: </label>{{hero.id}}</div>
<div><label>name: </label>{{hero.name}}</div>
`

编辑英雄

我们需要在文本框里编辑英雄的名字,重构英雄名字部分的模板,增加一个<input>元素.

1
2
3
4
5
6
7
8
9
template:`
<h1>{{title}}</h1>
<h2>{{hero.name}} details!</h2>
<div><label>id: </label>{{hero.id}}</div>
<div>
<label>name: </label>
<input value="{{hero.name}}" placeholder="name">
</div>
`

现在浏览器上英雄名字确实显示到了<input>文本框里.但似乎有些不对,当我们改变名字的时候,我们发现这些改变并没有反应到<h2>里.这种单向绑定到<input>的形式无法满足需求.

双向绑定

我们现在的需求是这样的,<input>框内显示英雄的名字,修改它,绑定了这个英雄名字的其他地方都需要对应改变.简而言之,我们想要双向数据绑定.

让我们使用ngModel这个内置指令来实现双向绑定.

关于ngModel的更多信息可以查看表单模板语法章节

用以下HTML替换<input>:

1
<input [(ngModel)]="hero.name" placeholder="name">

刷新浏览器,我们再次编辑英雄的名字,可以发现<h2>里的内容也可以联动起来了.

本章小结

让我们看看本章做了些什么.

  • 英雄之旅使用大括号插入显示应用的title以及hero对象特性.
  • 通过使用内建指令ngModel<input>元素和组件数据进行双向绑定
  • ngModel指令将数据变化响应到绑定的hero.name特性上.

app.component.ts代码如下:

1
2
3
4
5
6
7
8
9
10
11
12
13
14
15
16
17
18
19
20
21
22
23
24
import { Component } from '@angular/core';
export class Hero {
id: number;
name: string;
}
@Component({
selector: 'my-app',
template: `
<h1>{{title}}</h1>
<h2>{{hero.name}} details!</h2>
<div><label>id: </label>{{hero.id}}</div>
<div>
<label>name: </label>
<input [(ngModel)]="hero.name" placeholder="name">
</div>
`
})
export class AppComponent {
title = 'Tour of Heroes';
hero: Hero = {
id: 1,
name: 'Windstorm'
};
}

未来之路

现在的应用只展示了一个英雄,我们希望展示一个英雄的列表,同时允许用户可以点击选择查看他们的详情.下一章节,我们将会学习到如何获取一个列表,并将他们绑定到模板上,渲染到页面可供用户选择.

Master/Detail

有很多英雄

我们的故事需要更多的英雄.我们可以扩展英雄之旅APP展示英雄列表,允许用户选择英雄并显示英雄的详情.

这部分的在线示例.

让我们来预估下显示一个英雄列表需要做点什么. 首先,我们需要一个英雄的列表数据.然后,我们将它通过视图模板展示出来.

显示英雄们

创建英雄数据

app.component.ts底部创建一个包含10个英雄的数组.

1
2
3
4
5
6
7
8
9
10
11
12
const HEROES: Hero[] = [
{ id: 11, name: 'Mr. Nice' },
{ id: 12, name: 'Narco' },
{ id: 13, name: 'Bombasto' },
{ id: 14, name: 'Celeritas' },
{ id: 15, name: 'Magneta' },
{ id: 16, name: 'RubberMan' },
{ id: 17, name: 'Dynama' },
{ id: 18, name: 'Dr IQ' },
{ id: 19, name: 'Magma' },
{ id: 20, name: 'Tornado' }
];

数组HEROESHero类型的,类型已在上一章节定义,为了创建这个英雄数组.我们最终希望可以从web service获取这个列表,目前我们先用模拟数据代替.

展示英雄

AppComponent里创建一个public的heroes特性并绑定.

1
public heroes = HEROES;

我们并不需要声明heroes类型,TS可以隐式赋值为HEROES数组.

在模板里展示英雄

我们的组件有heroes,让我们再创建一个无序列表.将以下的HTML代码插入到模板里.

1
2
3
4
5
6
<h2>My Heroes</h2>
<ul class="heroes">
<li>
<!-- each hero goes here -->
</li>
</ul>

现在我们已经有模板了,开始填充英雄数据.

使用ngFor展示英雄列表

我们想绑定heroes数组绑定到组件的模板里,并迭代渲染展示他们.

首先修改<li>标签,增加内置指令*ngFor.

1
<li *ngFor="let hero of heroes" >

前置符*表示<li>元素节点以及它的子孙节点组成一个主模板.ngFor指令迭代AppComponent.heroes数组,并放入hero变量中.

现在我们可以在<li>标签里插入一些内容了:

1
2
3
<li *ngFor="let hero of heroes">
<span class="badge">{{hero.id}}</span> {{hero.name}}
</li>

样式化

我们的英雄列表看起来比较乏味,我们需要一些视觉效果,如在某个英雄上鼠标悬停或者英雄选择.

通过在@component里设置styles特性.将样式加入到组件.

1
2
3
4
5
6
7
8
9
10
11
12
13
14
15
16
17
18
19
20
21
22
23
24
25
26
27
28
29
30
31
32
33
34
35
36
37
38
39
40
41
42
43
44
45
46
47
48
49
styles: [`
.selected {
background-color: #CFD8DC !important;
color: white;
}
.heroes {
margin: 0 0 2em 0;
list-style-type: none;
padding: 0;
width: 15em;
}
.heroes li {
cursor: pointer;
position: relative;
left: 0;
background-color: #EEE;
margin: .5em;
padding: .3em 0;
height: 1.6em;
border-radius: 4px;
}
.heroes li.selected:hover {
background-color: #BBD8DC !important;
color: white;
}
.heroes li:hover {
color: #607D8B;
background-color: #DDD;
left: .1em;
}
.heroes .text {
position: relative;
top: -3px;
}
.heroes .badge {
display: inline-block;
font-size: small;
color: white;
padding: 0.8em 0.7em 0 0.7em;
background-color: #607D8B;
line-height: 1em;
position: relative;
left: -1px;
top: -4px;
height: 1.8em;
margin-right: .8em;
border-radius: 4px 0 0 4px;
}
`]

请注意,组件样式只有该组件有效,不会影响到其他的HTML.现在用于展示英雄列表的模板如下:

1
2
3
4
5
6
<h2>My Heroes</h2>
<ul class="heroes">
<li *ngFor="let hero of heroes">
<span class="badge">{{hero.id}}</span> {{hero.name}}
</li>
</ul>

选择英雄

我们有一个英雄列表,我们也有了单个英雄的显示界面,但目前两者还没有关联起来.我们接下来想要做的是,在英雄列表里点击英雄,可以查看这个英雄的详情.这种UI模式就是广泛使用的master-detail.在这个示例中,master是英雄列表,detail是选择的英雄.让我们通过一个绑定点击事件的selectedHero组件来连接masterdetail.

点击事件

修改模板<li>标签,插入Angular事件绑定到鼠标点击事件.

1
2
3
<li *ngFor="let hero of heroes" (click)="onSelect(hero)">
<span class="badge">{{hero.id}}</span> {{hero.name}}
</li>

来看看事件绑定:

1
(click)="onSelect(hero)"

这个插入语指示了<li>元素是click事件的目标,在等于符号右边的表达式调用了AppComponent方法,onSelect(),将模板内的变量hero作为参数传入,这个参数就是ngFor遍历的变量hero.

更多关于事件绑定可以查看用户输入模板语法章节.

增加点击句柄

我们的事件绑定的onSelect方法还没有实现,下面就来实现这个方法.

首先我们思考下,这个方法应该做些什么?它应该将组件内的选择英雄属性设置为用户点击的英雄.

声明选择的英雄

我们现在不需AppComponent组件内静态的hero特性了,用selectedHero特性替换它:

1
selectedHero: Hero;

selectedHero不进行初始化,如果用户不点击,这个值就为空.现在增加一个onSelect方法,将点击的hero特性设置为selectedHero.

1
onSelect(hero: Hero) { this.selectedHero = hero; }

将模板展示数据绑定selectedHero特性上.

1
2
3
4
5
6
<h2>{{selectedHero.name}} details!</h2>
<div><label>id: </label>{{selectedHero.id}}</div>
<div>
<label>name: </label>
<input [(ngModel)]="selectedHero.name" placeholder="name"/>
</div>

使用ngIf过滤空异常

当我们的app加载起来,我们看到英雄的列表,但此时没有英雄被选择,selectedHeroundefined.浏览器的控制窗口会有如下的打印:

1
EXCEPTION: TypeError: Cannot read property 'name' of undefined in [null]

我们之后会将英雄的详情作为组件移除,就不存在这个问题了,但在那之前要处理掉这个问题,就需要判断selectedHero是否为undefined,我们可以使用内置ngIf指令:

1
2
3
4
5
6
7
8
<div *ngIf="selectedHero">
<h2>{{selectedHero.name}} details!</h2>
<div><label>id: </label>{{selectedHero.id}}</div>
<div>
<label>name: </label>
<input [(ngModel)]="selectedHero.name" placeholder="name"/>
</div>
</div>

ngIfngFor都叫做结构指令,因为他能够改变DOM的部分结构,更对内容请查看结构指令模板语法章节.

刷新浏览器,我们可以看到英雄列表,但我们并没有选择英雄的详情页.当selectedHeroundefined的时候,ngIf从DOM过滤掉了这部分节点.当我们点击一个列表里的英雄,详情页面会出现,这就是我们想要的效果.

美化slection

被选择的英雄没有很直观的标示在英雄列表里,我们可以使用selected CSS类来改变主

  • 元素的样式.
  • 1
    [class.selected]="hero === selectedHero"

    中括号里的class.selected,这是一种特性绑定的方法,即从某个数据源(表达式 hero === selectedHero)单向流入到特性中.

    1
    2
    3
    4
    5
    <li *ngFor="let hero of heroes"
    [class.selected]="hero === selectedHero"
    (click)="onSelect(hero)">
    <span class="badge">{{hero.id}}</span> {{hero.name}}
    </li>

    可以在模板语法章节查看更多关于特性绑定的内容.

    重新加载app到浏览器,我们选择英雄Magneta,就有高亮标示了.
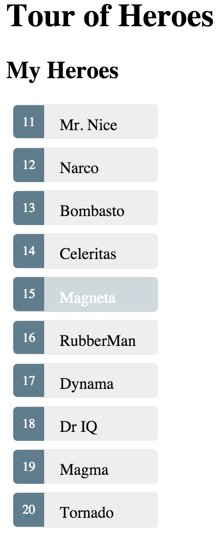
    完整的app.component.ts代码如下:

    1
    2
    3
    4
    5
    6
    7
    8
    9
    10
    11
    12
    13
    14
    15
    16
    17
    18
    19
    20
    21
    22
    23
    24
    25
    26
    27
    28
    29
    30
    31
    32
    33
    34
    35
    36
    37
    38
    39
    40
    41
    42
    43
    44
    45
    46
    47
    48
    49
    50
    51
    52
    53
    54
    55
    56
    57
    58
    59
    60
    61
    62
    63
    64
    65
    66
    67
    68
    69
    70
    71
    72
    73
    74
    75
    76
    77
    78
    79
    80
    81
    82
    83
    84
    85
    86
    87
    88
    89
    90
    91
    92
    93
    94
    import { Component } from '@angular/core';
    export class Hero {
    id: number;
    name: string;
    }
    const HEROES: Hero[] = [
    { id: 11, name: 'Mr. Nice' },
    { id: 12, name: 'Narco' },
    { id: 13, name: 'Bombasto' },
    { id: 14, name: 'Celeritas' },
    { id: 15, name: 'Magneta' },
    { id: 16, name: 'RubberMan' },
    { id: 17, name: 'Dynama' },
    { id: 18, name: 'Dr IQ' },
    { id: 19, name: 'Magma' },
    { id: 20, name: 'Tornado' }
    ];
    @Component({
    selector: 'my-app',
    template: `
    <h1>{{title}}</h1>
    <h2>My Heroes</h2>
    <ul class="heroes">
    <li *ngFor="let hero of heroes"
    [class.selected]="hero === selectedHero"
    (click)="onSelect(hero)">
    <span class="badge">{{hero.id}}</span> {{hero.name}}
    </li>
    </ul>
    <div *ngIf="selectedHero">
    <h2>{{selectedHero.name}} details!</h2>
    <div><label>id: </label>{{selectedHero.id}}</div>
    <div>
    <label>name: </label>
    <input [(ngModel)]="selectedHero.name" placeholder="name"/>
    </div>
    </div>
    `,
    styles: [`
    .selected {
    background-color: #CFD8DC !important;
    color: white;
    }
    .heroes {
    margin: 0 0 2em 0;
    list-style-type: none;
    padding: 0;
    width: 15em;
    }
    .heroes li {
    cursor: pointer;
    position: relative;
    left: 0;
    background-color: #EEE;
    margin: .5em;
    padding: .3em 0;
    height: 1.6em;
    border-radius: 4px;
    }
    .heroes li.selected:hover {
    background-color: #BBD8DC !important;
    color: white;
    }
    .heroes li:hover {
    color: #607D8B;
    background-color: #DDD;
    left: .1em;
    }
    .heroes .text {
    position: relative;
    top: -3px;
    }
    .heroes .badge {
    display: inline-block;
    font-size: small;
    color: white;
    padding: 0.8em 0.7em 0 0.7em;
    background-color: #607D8B;
    line-height: 1em;
    position: relative;
    left: -1px;
    top: -4px;
    height: 1.8em;
    margin-right: .8em;
    border-radius: 4px 0 0 4px;
    }
    `]
    })
    export class AppComponent {
    title = 'Tour of Heroes';
    heroes = HEROES;
    selectedHero: Hero;
    onSelect(hero: Hero) { this.selectedHero = hero; }
    }

    小结

    本章小结:

    • 我们现在可以选择列表里的英雄了
    • 应用由了选择并展示英雄详情的功能
    • 我们学习了怎么在组件模板里使用内置指令ngIfngFor

    现在英雄之旅初具雏形,但还远远没有完成,我们不能使用单个组件来实现整个app,需要将组件分成若干个子组件,并将他们有效的组合起来.

    多组件

    重构master/detail视图到分离的组件

    构建一个英雄详情组件

    我们的英雄列表和我们的英雄详情目前处于一个文件里.他们现在虽然很小但是不利于扩展.我们目前的组件设计遵守单一组件原则,虽然这只是个教程,但精益求精依然是要追求的,尤其是使用Angular是非常容易做到这一点的.

    让我们将英雄详情移出目前组件

    分离英雄详情组件

    app文件夹里增加一个新的文件hero-detail.component.ts,并创建如下的HeroDetailComponent:

    app/hero-detail.component.ts (initial version)

    1
    2
    3
    4
    5
    6
    7
    8
    import { component. Input } from '@angular/core';

    @component({
    selector: 'my-hero-detail',
    })
    export class HeroDetailComponent{

    }

    命名规则
    我们希望通过文件名可以知道对应的组件名.所有组件的文件后缀名已.component结尾.如HeroDetailComponent对应的文件名为hero-detail.component.ts.

    英雄详情模板

    现在,HeroesHero详情视图还在AppComponent的模板里.让我们英雄详情相关的内容黏贴到HeroDetailComponent里.

    我们之前绑定了AppComponentselectedHero.name特性.在新的模板中将selectedHero替换为hero.

    app/hero-detail.component.ts (template)

    1
    2
    3
    4
    5
    6
    7
    8
    9
    10
    template: `
    <div *ngIf="hero">
    <h2>{{hero.name}} details!</h2>
    <div><label>id: </label>{{hero.id}}</div>
    <div>
    <label>name: </label>
    <input [(ngModel)]="hero.name" placeholder="name"/>
    </div>
    </div>
    `

    现在英雄详情展示只会在HeroDetailComponent里.

    增加hero特性

    Hero类从app.component.ts移出,创建并放入一个hero.ts文件里.

    app/hero.ts

    1
    2
    3
    4
    export class Hero {
    id: number;
    name: string;
    }

    我们将Hero类从hero.ts暴露出来,因为我们需要在多个地方引用它.在app.component.tshero-detail.component.ts增加以下的语句引用Hero:

    1
    import { Hero } from './hero';

    hero特性是输入

    HeroDetailComponent需要被告之哪个英雄需要显示,谁可以干这个事?它的父组件AppComponent!

    AppComponent知道哪个英雄需要显示:就是用户从列表里选择的那个.用户选择被放入selectedHero特性.

    我们更新模板,将HeroDetailComponenthero特性和AppComponentselectedHero绑定.

    1
    <my-hero-detail [hero]="selectedHero"></my-hero-detail>

    注意到hero特性是特性绑定的目标-它在方括号里并处于(=)号的左边.

    Angular主张将目标特性作为一个可输入的特性,如果不这样做,Angular就会拒绝绑定并抛出异常.

    input特性的详情请看这里.

    有若干方法可以声明hero是一个输入特性.我们可以按选择,比如在hero特性里加一个@Input注释.

    1
    2
    @Input()
    hero: Hero;

    更多关于@Input装饰器内容查看属性指令章节.

    更新AppComponent

    AppComponent里导入HeroDetailComponent.

    1
    import { HeroDetailComponent } from './hero-detail.component';

    在模板中找到移除Hero Detail内容的地方,增加一个表示HeroDetailComponent的元素标签,并将AppComponentselectedHero特性和HeroDetailComponenthero特性进行双向绑定.

    1
    <my-hero-detail [hero]="selcetedHero"></my-hero-detail>

    此时AppComponent模板如下:

    1
    2
    3
    4
    5
    6
    7
    8
    9
    10
    11
    12
    template: `
    <h1>{{title}}</h1>
    <h2>My Heroes</h2>
    <ul class="heroes">
    <li *ngFor="let hero of heroes"
    [class.selected]="hero === selectedHero"
    (click)="onSelect(hero)">
    <span class="badge">{{hero.id}}</span> {{hero.name}}
    </li>
    </ul>
    <my-hero-detail [hero]="selectedHero"></my-hero-detail>
    `,

    HeroDetailComponent 可以接收AppComponent的选择事件,并在list底部将这个英雄的详情展示出来,这个详情会随着用户的选择而改变.但是!现在什么也没有发生!我们在英雄之间来回点击,但没有详情显示,我们也没有调试到任何的错误信息.

    这有点像是Angular忽略了这个新的标签,事实上确实如此.

    指令数组

    浏览器会忽略它不识别的HTML标签和属性,Angular也是如此.我们导入HeroDetailComponent,在模板里使用它,但并没有告诉Angular它是什么.
    如何告诉Angular?将组件列入元数据directives数组:

    1
    directives: [HeroDetailComponent]

    现在功能实现了,我们也创建了第一个可复用的组件!

    小结

    本章小结

    • 我们创建了一个可复用的组件
    • 我们学习了如何让组件接收输入信息
    • 我们学习了绑定父组件和子组件
    • 我们学习了如何声明应用指令

    未来之路

    我们的英雄之旅将会有可多可复用的组件.我们现在模拟数据依然处于AppComponent中,这并不合理.我们需要重构数据接入组件,将它放到分离的服务里,可被其他组件共享.

    下一章,我们将学习如何创建Services.

    Services

    我们创建一个可复用的service来管理英雄数据的调用

    英雄之旅在逐步进化,可以预料以后将会增加更多的组件.多个组件需要获取英雄数据信息,我们并不想通过重复拷贝相同的代码来实现它.所以,我们将要创建一个可复用的数据服务,并学习怎么将它注入到组件里.

    重构数据获取方式将它放入到分离的服务里,可以保持组件只关注它的视图,也可以使用模拟服务使得组件的单元测试更加方便.

    因为数据services始终是异步的,本章最后我们将用基于Promise机制来实现数据服务.

    创建一个英雄Service

    我们的合伙人说我们的这个APP有巨大的潜力,他们告诉我们他们想通过各种方法在不同的页面像是英雄信息.我们已经可以从列表里选择英雄,我们马上就需要增加一个仪表板来展示顶尖的英雄们,创建一个单独的视图来渲染英雄详情编辑界面,这三个视图都需要英雄数据.

    AppComponent里定义了要展示的英雄模拟数据.我们需要至少2个对象.首先,如何定义英雄并不是组件完成的.其次,我们并不能简单的再其他组件和视图之间分享英雄列表.

    创建一个HeroService

    app文件夹里创建一个名为hero.service.ts.

    app/hero.service.ts

    1
    2
    3
    4
    5
    import { Injectable } from '@angular/core';

    @Injectable()
    export class HeroService {
    }

    我们将Angualr的Injectable功能导入了,使用@Injectable()注释注入Services.

    千万不要忘了()!否则很难诊断问题.

    获取Heros

    增加一个getHeroes方法(打桩):

    1
    2
    3
    4
    5
    @Injectable()
    export class HeroService {
    getHeroes() {
    }
    }

    这里有个重要的问题我们稍后再说.现在服务的消费者并不知道服务是如何获取到数据的.我们的HeroService可以从任何地方获取Hero数据.它可以从一个web服务里获取,可以从本地存储获取,甚至可以从一个模拟数据源里获取. 这就是将数据获取从组件移除最美妙的地方,我们可以根据具体实现来变更数据实现方式.

    模拟英雄数据

    我们已经在AppComponent里模拟了Hero数据.它并不属于那,也不属于service这.我们将模拟数据一到它自己的文件里.

    创建一个mock-heroes.ts文件,将模拟数据放到这里:

    1
    2
    3
    4
    5
    6
    7
    8
    9
    10
    11
    12
    13
    14
    import {hero} from './hero';

    export var HEROES: hero[] = [
    {id: 11, name: 'Mr. Nice'},
    {id: 12, name: 'Narco'},
    {id: 13, name: 'Bombasto'},
    {id: 14, name: 'Celeritas'},
    {id: 15, name: 'Magneta'},
    {id: 16, name: 'RubberMan'},
    {id: 17, name: 'Dynama'},
    {id: 18, name: 'Dr IQ'},
    {id: 19, name: 'Magma'},
    {id: 20, name: 'Tornado'}
    ];

    我们导出HEROES常量,这样就可以在其他地方使用它了,比如HeroService.

    同时,回到app.component.ts,将heroes特性回复到未初始化状态.

    1
    heroes: Hero[];

    返回模拟英雄数据

    回到HeroService我们导入模拟数据HEROES并返回给getHeroes方法.我们的HeroService现在看起来是这样的:

    1
    2
    3
    4
    5
    6
    7
    8
    9
    10
    import { Injectable } from '@angular/core';

    import { HEROES } from './mock-heroes';

    @Injectable()
    export class HeroService {
    getHeroes() {
    return HEROES;
    }
    }

    使用英雄Service

    我们已经准备好在其他组件里使用HeroSevice了,从AppComponent开始.

    首先,我们先导入它 import { HeroService } from './hero.service';.

    导入Service后,允许我们引用它的代码.AppComponent是怎样获取HeroService实例的?

    new一个实例吗?不行!

    我们可以new一个新的HeroService实例,如:

    1
    heroService = new HeroService(); // don't do this

    但这么做有几点不好的地方:

    • 我们的组件需要知道如何构建HeroService示例.如果我们改变了HeroService的构造函数,我们就需要找到所有使用了这个service的地方,并修改它.不利于维护和扩展.
    • 我们每次都new一个service,当需要缓存和共享数据这些数据的时候,我们就无法满足了.
    • 我们现在将HeroService锁定到了AppComponent,如果执行场景有变化的时候我们该怎么办呢?我们可以离线操作吗?需要对不同的模拟版本进行单元测试?这很难办到.

    要解决这些问题真的非常容易.那就是注入HeroService:

    1. 我们增加一个构造器并定义一个私有特性
    2. 我们增加一个组件的provider元数据.

    构造器如下:

    app/app.component.ts

    1
    constructor(private heroService: HeroService) { }

    构造器并没有干什么,参数同时定义了一个私有的heroService属性并指定它未HeroService的注入站点.

    现在当构建一个新的AppComponent的时候,Angular就可以支持HeroService的实例构建了.

    更多信息,请查看依赖注入章节.

    注入器并不知道怎么创建HeroService.如果我们执行代码.此时Angualr会报错:

    1
    EXCEPTION: No provider for HeroService! (AppComponent -> HeroService)

    我们需要通过注册一个HeroService的容器来告诉注入器如何构建HeroService.如下,在@Component里增加一个providers数组属性.

    1
    providers: [HeroService]

    providers数组告诉Angular,当构建一个新的AppComponent的时候就会创建一个新的HeroService实例.AppComponent以及它的子组件都可以使用这个service去获取英雄数据.

    1
    2
    3
    getHeroes() {
    this.heroes = this.heroService.getHeroes();
    }

    ngOnInit生命周期Hook

    AppComponent应该立即获取和展示英雄们,我们在哪里调用getHeroes方法?在构造器里?我们不这样做!

    数年挖坑填坑之痛告诉我们,要保持构造器的逻辑尽量简单,尤其当我们还需要调用server的data数据的时候.

    构造器用于一些简单的初始化工作,比如讲参数写入属性里,并不适合做太重的活,所以需要在其他地方调用getHeroes.

    Angular将会在ngOnInit生命周期Hook里调用这个getHeroes. Angular 提供了数个接口可以进入组件生命周期的关键节点:创建,改变后,消除.

    每一个接口对用一个单独的方法,当组件应用了这个方法,Angular会在合适的时间调用他.

    关于生命周期详细内容请查看生命周期Hook章节

    以下是OnInit接口的基本应用框架:

    1
    2
    3
    4
    5
    6
    import { OnInit } from '@angular/core';

    export class AppComponent implements OnInit {
    ngOnInit() {
    }
    }

    我们在ngOnInit里写入符合该逻辑的方法,Angualr会在合适的地方调用它.

    1
    2
    3
    ngOnInit() {
    this.getHeroes();
    }

    我们的应用如我们期望运行,显示了一组英雄列表,当我们选择点击的时候,可以查看该英雄的详情.

    异步服务和Promises

    我们的HeroService会立即返回一组模拟的英雄,getHeroes是同步的.

    1
    this.heroes = this.heroService.getHeroes();

    当某天我们想从远程服务器获取heroes的时候,虽然我们现在还不能通过http调用,但后面的章节我们马上就要这样了.我们将不得不等待服务器的响应信息,我们不能让UI跟着等待,因为浏览器是不会堵塞的.

    我们就需要一些一步技术来调用getHeroes方法.我们使用Promises.

    Promise就是说它保证会结果准备好的时候回调我们.我们给服务器发了一个异步请求并将回调函数告诉它.当请求有结果的时候,服务器会回调告诉我们结果.

    更新HeroService:

    1
    2
    3
    getHeroes() {
    return Promise.resolve(HEROES);
    }

    使用Promise

    回到AppComponentgetHeroes方法,目前代码如下:

    1
    2
    3
    getHeroes() {
    this.heroes = this.heroService.getHeroes();
    }

    我们需要修改代码来解析Promise:

    1
    2
    3
    getHeroes() {
    this.heroService.getHeroes().then(heroes => this.heroes = heroes);
    }

    查看APP结构

    1
    2
    3
    4
    5
    6
    7
    8
    9
    10
    11
    12
    13
    14
    15
    16
    17
    18
    19
    20
    21
    22
    23
    24
    25
    26
    27
    28
    29
    30
    31
    --angular2-tour-of-heroes

    ----app

    ------app.component.ts

    ------hero.ts

    ------hero-detail.component.ts

    ------hero.service.ts

    ------main.ts

    ------mock-heroes.ts

    ----node_modules ...

    ----typings ...

    ----index.html

    ----package.json

    ----styles.css

    ----systemjs.config.js

    ----tsconfig.json

    ----typings.json

    小结

    本章小结

    • 我们创建了一个可分享的服务类
    • 我们使用ngOnInit生命周期的挂钩来获取英雄数据列表
    • 我们在AppComponent里将HeroService定义为一个provider
    • 我们创建模拟英雄数据并将它导入服务.
    • 我们将服务设计为异步Promise,让组件从Promise里解析获取数据.

    下一章

    我们的英雄之旅代码现在有了可复用的服务,我们现在想创建一个导航栏,可以在仪表盘和英雄详情编辑页里来回切换.

    路由

    英雄之旅的新需求:

    • 增加一个Dashboard视图
    • 可以在HeroesDashboard视图来回切换
    • 点击选择英雄可以跳转到英雄详情

    计划

    • AppComponent变为处理导航的外壳.
    • Heroes相关内容从AppComponent重定向HeroesComponent.
    • 增加路由
    • 创建一个DashboardComponent
    • Dashboard绑定到导航结构.

    重组AppComponent

    我们当前应用加载AppComponent并立即展示英雄列表.现在我们先进入导航界面. AppComponent应该只处理导航,将英雄显示相关部分移到它自己的组件HeroesComponent.

    HerosComponent

    目前的AppComponent主要专注于英雄展示,将其改名未HerosComponent,改名步骤如下:

    • app.component.ts改为heroes.component.ts
    • AppComponent类改名为HeroesComponent
    • 选择器my-app改为my-heroes
    1
    2
    3
    4
    5
    @Component({
    selector: 'my-heroes',
    })
    export class HeroesComponent implements OnInit {
    }

    创建AppComponent

    • 创建一个新文件名app.component.ts
    • 定义一个AppComponent
    • 导出模块以便可在main.ts引用
    • 定义title属性
    • 增加一个有my-app选择器的@Component元数据装饰器
    • 增加一个有<h1>标签的模板并绑定到title属性
    • 模板里增加<my-heroes>标签用于显示英雄
    • HeroesComponent放入directives数组,这样Angluar就可以识别<my-heroes>标签了.
    • 增加HeroServiceproviders数组,因为我们在其他视图中也需要它.
    • 增加支持import语句.
    1
    2
    3
    4
    5
    6
    7
    8
    9
    10
    11
    12
    13
    14
    15
    16
    17
    import { Component }       from '@angular/core';
    import { HeroService } from './hero.service';
    import { HeroesComponent } from './heroes.component';
    @Component({
    selector: 'my-app',
    template: `
    <h1>{{title}}</h1>
    <my-heroes></my-heroes>
    `,
    directives: [HeroesComponent],
    providers: [
    HeroService
    ]
    })
    export class AppComponent {
    title = 'Tour of Heroes';
    }

    这个app依然可以显示英雄,我们的重构工作就完成了.

    增加路由

    我们准备进行下一步.和自动展示英雄相比,我们更喜欢点击展示的方式,换句话说,我们想当行到英雄列表.这个时候我们就需要Angular的组件路由功能.

    设置基础标签

    打开index.html在顶部的<head>部分增加<base href="/">.

    1
    2
    <head>
    <base href="/">

    使路由可见

    组件路由器是一个服务,和其他服务一样,我们需要先导入它,并将它让入providers数组.

    Angular路由是有由多服务(ROUTER_PROVIDERS),多指令(ROUTER_DIRECTIVES)和一个配置装饰器(RouteConfig)组成,将他们全部导入:

    app/app.component.ts

    1
    import { RouteConfig, ROUTER_DIRECTIVES, ROUTER_PROVIDERS } from '@angular/router-deprecated';

    然后,我们升级directivesproviders元数组,让组件包含这些路由成分:

    1
    2
    3
    4
    5
    directives: [ROUTER_DIRECTIVES],
    providers: [
    ROUTER_PROVIDERS,
    HeroService
    ]

    注意到我们将HeroesComponentdirectives数组移除了.AppComponent不再显示英雄;这是路由器的工作,我们很快也会把<my-heroes>从模板移除.

    增加配置路由器

    现在AppComponent还没有包括路由器,我们现在使用@RouteConfig装饰器(a)给组件分配一个路由器(b)使用routes配置路由器.

    当用户点击某个连接或者在浏览器输入URL的时候,routes告诉路由器哪个视图是应该对应显示的.

    app/app.component.ts (RouteConfig):

    1
    2
    3
    4
    5
    6
    7
    @RouteConfig([
    {
    path: '/heroes',
    name: 'Heroes',
    component: HeroesComponent
    }
    ])

    @RouteConfig 数组定义了路由,之后会有更多的路由.

    这个路由定义只要有三个部分:

    • path: 路由器对浏览器里URL的路径进行匹配(/heroes).
    • name: 路由的正式命名;为了和路径区分,命名必须首字母大写.
    • component: 路由对应的组件名字

    深入请翻阅Routing章节

    路由器出口

    如果我们在浏览器输入/heroes对应地址,路由器会匹配Heroes路由并渲染HeroesComponent组件.但在哪里显示?<router-outlet>!我们在应用里导航,路由器会将对应组件显示到<router-outlet>之下.

    路由器链接

    我们并不期望用户直接粘贴URL到浏览器地址栏,我们在模板里增加一个锚标签供用户点击.

    1
    2
    3
    4
    5
    template: `
    <h1>{{title}}</h1>
    <a [routerLink]="['Heroes']">Heroes</a>
    <router-outlet></router-outlet>
    `,

    注意到[routerLink]绑定到一个锚标签上.我们将RouterLink指令绑定一个路由,当用户点击链接的时候就知道导航的位置.

    我们使用链接参数数组定义了路由指示,这个数组在当前示例中,显示一个元素,括号内是路由到组件HeroesComponent的名字Heroes.

    更多关于链接数组相关内容请查看路由章节.

    刷新浏览器,我们只看到app的title,并没有看到heroes列表,当我们点击Heroes导航链接就发现了英雄列表.

    app/app.component.ts (v2)

    1
    2
    3
    4
    5
    6
    7
    8
    9
    10
    11
    12
    13
    14
    15
    16
    17
    18
    19
    20
    21
    22
    23
    24
    25
    26
    27
    import { Component } from '@angular/core';
    import { RouteConfig, ROUTER_DIRECTIVES, ROUTER_PROVIDERS } from '@angular/router-deprecated';
    import { HeroService } from './hero.service';
    import { HeroesComponent } from './heroes.component';
    @Component({
    selector: 'my-app',
    template: `
    <h1>{{title}}</h1>
    <a [routerLink]="['Heroes']">Heroes</a>
    <router-outlet></router-outlet>
    `,
    directives: [ROUTER_DIRECTIVES],
    providers: [
    ROUTER_PROVIDERS,
    HeroService
    ]
    })
    @RouteConfig([
    {
    path: '/heroes',
    name: 'Heroes',
    component: HeroesComponent
    }
    ])
    export class AppComponent {
    title = 'Tour of Heroes';
    }

    AppComponent现在关联到了路由器并显示路由的视图.基于这些功能有别于其他组件,我们称这类组件为路由器组件.

    增加一个仪表盘

    当我们有多个视图的时候,路由才有意义.我们需要另外一个视图.

    app/dashboard.component.ts (v1)

    1
    2
    3
    4
    5
    6
    7
    import { Component } from '@angular/core';

    @Component({
    selector: 'my-dashboard',
    template: '<h3>My Dashboard</h3>'
    })
    export class DashboardComponent { }

    配置dashboard路由

    回到app.component.ts配置导航到dashboard的路由.

    导入DashboardComponent,在@RouteConfig里定义Dashboard路由.

    app/app.component.ts

    1
    2
    3
    4
    5
    6
    {
    path: '/dashboard',
    name: 'Dashboard',
    component: DashboardComponent,
    useAsDefault: true
    },

    最后,增加一个导航链接到模板里:

    1
    2
    3
    4
    5
    6
    7
    8
    template: `
    <h1>{{title}}</h1>
    <nav>
    <a [routerLink]="['Dashboard']">Dashboard</a>
    <a [routerLink]="['Heroes']">Heroes</a>
    </nav>
    <router-outlet></router-outlet>
    `,

    刷新浏览器,我们可以在dashboard和heroes之间来回切换了.

    Dashboard顶级英雄

    让我们用4个顶级英雄来填充dashboard.将template元数据用templateUrl替换:

    1
    2
    3
    app/dashboard.component.ts (templateUrl)

    templateUrl: 'app/dashboard.component.html',

    我们使用了全路径,这是因为Angular默认不支持相对路径,具体可以查看组件相对路径.

    创建文件app/dashboard.component.html,内容如下:

    1
    2
    3
    4
    5
    6
    7
    8
    <h3>Top Heroes</h3>
    <div class="grid grid-pad">
    <div *ngFor="let hero of heroes" (click)="gotoDetail(hero)" class="col-1-4">
    <div class="module hero">
    <h4>{{hero.name}}</h4>
    </div>
    </div>
    </div>

    我们使用*ngFor来遍历英雄列表并展示英雄名字,我们增加一个额外的<div>元素用于后面进行样式化.

    在这里有个(click)绑定到gotoDetail方法上,这个方法我们现在还没有.

    共享HeroService

    我们复用HeroService来获取组件的英雄数组.回顾之前的章节,我们HeroService从HeroesComponent的providers数组移到了最高级的AppComponent组件上.这样就使得HeroService成为一个单例,对所有的应用组件生效.Angular将会注入HeroService,我们就可以在DashboardComponent里使用它.

    获取heroes

    打开dashboard.component.ts,代码如下:

    1
    2
    3
    4
    5
    6
    7
    8
    9
    10
    11
    12
    13
    14
    import { Component, OnInit } from '@angular/core';

    import { Hero } from './hero';
    import { HeroService } from './hero.service';

    export class DashboardComponent implements OnInit {
    heroes: Hero[] = [];
    constructor(private heroService: HeroService) { }
    ngOnInit() {
    this.heroService.getHeroes()
    .then(heroes => this.heroes = heroes.slice(1, 5));
    }
    gotoDetail() { /* not implemented yet */}
    }

    和创建HerosComponent类似,在这里我们创建一个heroes数组属性,注入HeroService并将他保存在私有字段heroService里,然后在Angular的ngOnInit生命周期里调用这个服务.

    不同的是:我们使用slice挑选了4个英雄(2-5),并将gotoDetail方法打桩,刷新浏览器,我们现在可以看到4个英雄.

    导航到英雄详情

    虽然我们在HeroesComponent底部现实了选择英雄的详情,蛋我们还不能满足以下几种导航需求:

    1. 在Dashboard选择英雄
    2. 在英雄列表选择英雄
    3. 浏览器里输入完成的URl来显示英雄
    

    增加一个HeroDetail路由显然是个好的选择.

    路由到英雄详情

    我们在AppComponent增加一个到HeroDetailComponent的路由.这个路由不同的地方是需要给它指定具体的英雄,这和HeroesComponent,DashboardComponent不同,后者不需要传给他们任何参数.

    现在,父组件HeroesComponent将hero属性绑定到一个英雄对象:

    <my-hero-detail [hero]="selectedHero"></my-hero-detail>

    当前的代码还无法正常运行,我们还需要做如下的工作.

    路由参数

    我们可以在URL里增加一个英雄的id,比如路由到一个id是11的英雄,其URL为如下所示:

    /detail/11

    URL的/detail/部分是常量,尾部的数字id根据英雄不同而变化,我们需要配置路由并使用一个变量来便表示它.配置路由参数

    1
    2
    3
    4
    5
    {
    path: '/detail/:id',
    name: 'HeroDetail',
    component: HeroDetailComponent
    },

    路径中的冒号(:)是占位文字,当导航到HeroDetailComponent时用于填充对应的英雄id.现在HeroDetaiComponent代码如下:

    1
    2
    3
    4
    5
    6
    7
    8
    9
    10
    11
    12
    13
    14
    15
    16
    17
    18
    19
    20
    import { Component, Input } from '@angular/core';
    import { Hero } from './hero';
    @Component({
    selector: 'my-hero-detail',
    template: `
    <div *ngIf="hero">
    <h2>{{hero.name}} details!</h2>
    <div>
    <label>id: </label>{{hero.id}}
    </div>
    <div>
    <label>name: </label>
    <input [(ngModel)]="hero.name" placeholder="name"/>
    </div>
    </div>
    `
    })
    export class HeroDetailComponent {
    @Input() hero: Hero;
    }

    模板不需要改变,我们以同样的方式显示英雄,但获取英雄的方式变化了.我们现在不从父组件的属性绑定中获取英雄.HeroDetailComponent现在需要从路由器的RouteParams service获得id,并使用这个id从HeroService里获取hero数据.

    1
    2
    3
    import { RouteParams } from '@angular/router-deprecated';
    import { HeroService } from './hero.service';
    import { Component, OnInit } from '@angular/core';

    注入RouteParams和HeroService服务:

    1
    2
    3
    4
    constructor(
    private heroService: HeroService,
    private routeParams: RouteParams) {
    }

    在ngOnInit生命挂钩中,从RouteParams获取id参数,并从HeroService获取英雄

    1
    2
    3
    4
    5
    ngOnInit() {
    let id = +this.routeParams.get('id');
    this.heroService.getHero(id)
    .then(hero => this.hero = hero);
    }

    注意到我们调用RouteParams.get来或得id

    let id = +this.routeParams.get('id');

    由于英雄的id是一个数字,而Route得参数都是字符串,所以用JavaScript(+)进行数值转换.

    增加HeroService.getHero

    1
    2
    3
    4
    getHero(id: number) {
    return this.getHeroes()
    .then(heroes => heroes.filter(hero => hero.id === id)[0]);
    }

    返回

    用户通过选择点击或者URL输入跳转到HeroDetailComponent视图界面后,可以选择返回:

    1
    2
    3
    goBack() {
    window.history.back();
    }

    在对应模板增加返回点击事件绑定:

    1
    2
    3
    4
    5
    6
    7
    8
    9
    10
    <div *ngIf="hero">
    <h2>{{hero.name}} details!</h2>
    <div>
    <label>id: </label>{{hero.id}}</div>
    <div>
    <label>name: </label>
    <input [(ngModel)]="hero.name" placeholder="name" />
    </div>
    <button (click)="goBack()">Back</button>
    </div>

    最后,我们的HeroDettailComponent如下:

    1
    2
    3
    4
    5
    6
    7
    8
    9
    10
    11
    12
    13
    14
    15
    16
    17
    18
    19
    20
    21
    22
    23
    24
    25
    26
    27
    28
    import { Component, OnInit } from '@angular/core';
    import { RouteParams } from '@angular/router-deprecated';

    import { Hero } from './hero';
    import { HeroService } from './hero.service';

    @Component({
    selector: 'my-hero-detail',
    templateUrl: 'app/hero-detail.component.html',
    })
    export class HeroDetailComponent implements OnInit {
    hero: Hero;

    constructor(
    private heroService: HeroService,
    private routeParams: RouteParams) {
    }

    ngOnInit() {
    let id = +this.routeParams.get('id');
    this.heroService.getHero(id)
    .then(hero => this.hero = hero);
    }

    goBack() {
    window.history.back();
    }
    }

    选择一个Dashboard英雄

    当用户从dashboard选择一个英雄,应用将会跳转到HeroDetailComponent视图,并可以编辑英雄.

    在dashbaord的模板里,绑定了英雄点击事件到gotoDetail方法里,并将选择的英雄实体传入:

    <div *ngFor="let hero of heroes" (click)="gotoDetail(hero)" class="col-1-4">

    之前重写DashboardComponent的时候,我们还未完成gotoDetail方法,现在我们将它实现:

    1
    2
    3
    4
    gotoDetail(hero:Hero) {
    truelet link = ['HeroDetail', {id: hero.id}];
    truethis.router.navigate(link);
    }

    这个gotoDetail方法通过两个步骤导航:

    1. 设置一个路由连接参数数组
    2. 将该数组传入路由器的navigate方法
    

    link数组有两个元素,目标路由的命名以及路由参数对象,和在AppComponent中的路由配置是相对应的.

    1
    2
    3
    4
    5
    {
    path: '/detail/:id',
    name: 'HeroDetail',
    component: HeroDetailComponent
    },

    DashboardComponent还没有路由,我们将其加入:

    1
    2
    3
    4
    5
    6
    import { Router } from '@angular/router-deprecated';
    ...
    constructor(
    private router: Router,
    private heroService: HeroService) {
    }

    HerosComponent里选择一个英雄

    1
    2
    3
    4
    5
    6
    7
    8
    9
    10
    11
    12
    template: `
    <h1>{{title}}</h1>
    <h2>My Heroes</h2>
    <ul class="heroes">
    <li *ngFor="let hero of heroes"
    [class.selected]="hero === selectedHero"
    (click)="onSelect(hero)">
    <span class="badge">{{hero.id}}</span> {{hero.name}}
    </li>
    </ul>
    <my-hero-detail [hero]="selectedHero"></my-hero-detail>
    `,

    删除标签,我们不用显示完整的HeroDetailComponent了,它将显示在自己的页面上,同时当用户从列表选择一个英雄,我们将不会进入detail页面,我们先显示一个mini-detail页面,当用户再次点击这个页面的时候,才会导航到完全的详情页.

    增加一个mini-detail

    1
    2
    3
    4
    5
    6
    <div *ngIf="selectedHero">
    <h2>
    {{selectedHero.name | uppercase}} is my hero
    </h2>
    <button (click)="gotoDetail()">View Details</button>
    </div>

    在点击一个英雄后,用户将会看到以下的页面:

    注意到英雄名都是大写,这是UpperCasePipe的效果,(|)是一个管道操作符,管道擅长对格式化一些字符串,金钱符号,日期等数据.

    关于管道可以查看管道章节

    将内容移除组件文件

    我们还需要更新组件类,完成用户点击View Details按钮功能.这个组件文件越来越大,大部分是模板或者CSS样式,很难找到组件的逻辑代码,让我们稍微重构下:

    1. 将模板内容移动到hereos.component.html文件
    2. 将样式内容移到heroes.component.css文件
    3. 分别设置templateUrl和styleUrls为上述两文件
    
    1
    2
    3
    4
    5
    @Component({
    selector: 'my-heroes',
    templateUrl: 'app/heroes.component.html',
    styleUrls: ['app/heroes.component.css']
    })

    现在组件的代码比较干净了,可以更清晰的看出其逻辑:

    1. 导入router
    2. 将router注入构造器
    3. 实现gotoDetail方法:调用router.navigate方法传入HeroDetail的链接参数数组.
    
    1
    2
    3
    4
    5
    6
    7
    8
    9
    10
    11
    12
    13
    14
    15
    16
    17
    18
    19
    app/heroes.component.ts (class)

    export class HeroesComponent implements OnInit {
    heroes: Hero[];
    selectedHero: Hero;
    constructor(
    private router: Router,
    private heroService: HeroService) { }
    getHeroes() {
    this.heroService.getHeroes().then(heroes => this.heroes = heroes);
    }
    ngOnInit() {
    this.getHeroes();
    }
    onSelect(hero: Hero) { this.selectedHero = hero; }
    gotoDetail() {
    this.router.navigate(['HeroDetail', { id: this.selectedHero.id }]);
    }
    }

    App样式

    App的功能已经完成了,但是界面还不是很美观,我们的设计师提供了一些CSS文件来优化它.

    Dashboard样式

    设计师认为dashboard的英雄们用一组矩阵来显示,他们给了我们可实现响应式的大概60行CSS代码. 在aoo文件夹下面增加一个dashboard.component.css文件,并放入组件元数据styleUrls数组属性里.

    1
    2
    3
    4
    5
    6
    7
    8
    9
    10
    11
    12
    13
    14
    15
    16
    17
    18
    19
    20
    21
    22
    23
    24
    25
    26
    27
    28
    29
    30
    31
    32
    33
    34
    35
    36
    37
    38
    39
    40
    41
    42
    43
    44
    45
    46
    47
    48
    49
    50
    51
    52
    53
    54
    55
    56
    57
    58
    59
    60
    61
    62
    styleUrls: ['app/dashboard.component.css']

    [class*='col-'] {
    float: left;
    }
    *, *:after, *:before {
    -webkit-box-sizing: border-box;
    -moz-box-sizing: border-box;
    box-sizing: border-box;
    }
    h3 {
    text-align: center; margin-bottom: 0;
    }
    [class*='col-'] {
    padding-right: 20px;
    padding-bottom: 20px;
    }
    [class*='col-']:last-of-type {
    padding-right: 0;
    }
    .grid {
    margin: 0;
    }
    .col-1-4 {
    width: 25%;
    }
    .module {
    padding: 20px;
    text-align: center;
    color: #eee;
    max-height: 120px;
    min-width: 120px;
    background-color: #607D8B;
    border-radius: 2px;
    }
    h4 {
    position: relative;
    }
    .module:hover {
    background-color: #EEE;
    cursor: pointer;
    color: #607d8b;
    }
    .grid-pad {
    padding: 10px 0;
    }
    .grid-pad > [class*='col-']:last-of-type {
    padding-right: 20px;
    }
    @media (max-width: 600px) {
    .module {
    font-size: 10px;
    max-height: 75px; }
    }
    @media (max-width: 1024px) {
    .grid {
    margin: 0;
    }
    .module {
    min-width: 60px;
    }
    }

    英雄详情界面优化

    app目录下增加一个hero-detail.component.css文件,内容如下:

    1
    2
    3
    4
    5
    6
    7
    8
    9
    10
    11
    12
    13
    14
    15
    16
    17
    18
    19
    20
    21
    22
    23
    24
    25
    26
    27
    28
    29
    label {
    display: inline-block;
    width: 3em;
    margin: .5em 0;
    color: #607D8B;
    font-weight: bold;
    }
    input {
    height: 2em;
    font-size: 1em;
    padding-left: .4em;
    }
    button {
    margin-top: 20px;
    font-family: Arial;
    background-color: #eee;
    border: none;
    padding: 5px 10px;
    border-radius: 4px;
    cursor: pointer; cursor: hand;
    }
    button:hover {
    background-color: #cfd8dc;
    }
    button:disabled {
    background-color: #eee;
    color: #ccc;
    cursor: auto;
    }

    导航链接界面优化

    app目录下增加一个app.component.css文件,内容如下:

    1
    2
    3
    4
    5
    6
    7
    8
    9
    10
    11
    12
    13
    14
    15
    16
    17
    18
    19
    20
    21
    22
    23
    24
    25
    26
    27
    28
    h1 {
    font-size: 1.2em;
    color: #999;
    margin-bottom: 0;
    }
    h2 {
    font-size: 2em;
    margin-top: 0;
    padding-top: 0;
    }
    nav a {
    padding: 5px 10px;
    text-decoration: none;
    margin-top: 10px;
    display: inline-block;
    background-color: #eee;
    border-radius: 4px;
    }
    nav a:visited, a:link {
    color: #607D8B;
    }
    nav a:hover {
    color: #039be5;
    background-color: #CFD8DC;
    }
    nav a.router-link-active {
    color: #039be5;
    }

    应用全局样式

    之前的样式都是组件内有效,我们也可以在应用层面上组件之外创建一个全局样式,比如设计师提供一些基础样式需要在整个应用内有效的.

    1
    2
    3
    4
    5
    6
    7
    8
    9
    10
    11
    12
    13
    14
    15
    16
    17
    18
    19
    20
    21
    22
    23
    24
    25
    styles.css (app styles excerpt)

    /* Master Styles */
    h1 {
    color: #369;
    font-family: Arial, Helvetica, sans-serif;
    font-size: 250%;
    }
    h2, h3 {
    color: #444;
    font-family: Arial, Helvetica, sans-serif;
    font-weight: lighter;
    }
    body {
    margin: 2em;
    }
    body, input[text], button {
    color: #888;
    font-family: Cambria, Georgia;
    }
    /* . . . */
    /* everywhere else */
    * {
    font-family: Arial, Helvetica, sans-serif;
    }

    增加一个新的styles.css文件,并在index.html里引用它.

    <link rel="stylesheet" href="styles.css">

    现在我们的app是这个样子了.

    小结

    • 我们增加了一个Angular路由组件
    • 我们学习了如何创建导航菜单栏的路由链接.
    • 我们使用路由参数跳转到用户选择英雄的详情页
    • 多组件共享HeroService
    • 分离HTML和CSS文件到各自的文件
    • uppercase管道来格式化数据

    未来之路

    现在万事俱备,只欠东风了,就是远程数据接入.

    下一章,我们将从一个http服务器上来获取英雄数据.

    Http

    我们的合伙人对我们的项目进度非常满意,现在他们想要从别的服务器获取英雄数据了,让用户可以增加,编辑,删除英雄,并将改动同步到服务器.

    在这个章节,我们将会教大家如何响应和调用一个web服务的api.

    在线示例在此.

    Http准备

    Http并不是Angular的核心模块,它属于插件,分离在npm包进行管理.不过我们可以直接从@angular/http导入Http,因为systemjs.config已经配置SystemJS加载了这个库.

    注册http服务

    http服务还依赖于其他的services,HTTP_PROVIDERS,我们需要在应用的任意一个位置接入这些服务.所以当启动应用加载根组件AppComponent的时候,需要将这些服务注册到main.ts的bootstrap中.

    1
    2
    3
    4
    5
    6
    import { bootstrap }      from '@angular/platform-browser-dynamic';
    import { HTTP_PROVIDERS } from '@angular/http';

    import { AppComponent } from './app.component';

    bootstrap(AppComponent, [ HTTP_PROVIDERS ]);

    注意到HTTP_PROVIDERS时再一个数组中,这个和@Component的provicer效果类似.

    模拟web api

    我们一般建议将应用级别的服务注册到AppComponent的provicers里,这里我们注册到main里是有特殊的原因的.

    我们的应用需要经历很长一段时间的开发测试才能最终发布,那个时候我们甚至没有一个可以处理heroes的web服务,所以我们需要模拟一个,内存服务器,而这个web服务对应用来讲是透明了,它不需要知道这个是模拟环境还是真实环境,所以这部分的配置需要放到AppComponent上层来配置.

    app/main.ts

    1
    2
    3
    4
    5
    6
    7
    8
    9
    10
    11
    12
    13
    14
    15
    16
    17
    // Imports for loading & configuring the in-memory web api
    import { XHRBackend } from '@angular/http';

    import { InMemoryBackendService, SEED_DATA } from 'angular2-in-memory-web-api';
    import { InMemoryDataService } from './in-memory-data.service';

    // The usual bootstrapping imports
    import { bootstrap } from '@angular/platform-browser-dynamic';
    import { HTTP_PROVIDERS } from '@angular/http';

    import { AppComponent } from './app.component';

    bootstrap(AppComponent, [
    HTTP_PROVIDERS,
    { provide: XHRBackend, useClass: InMemoryBackendService }, // in-mem server
    { provide: SEED_DATA, useClass: InMemoryDataService } // in-mem server data
    ]);

    in-memory-data.service.ts文件,内容如下:

    1
    2
    3
    4
    5
    6
    7
    8
    9
    10
    11
    12
    13
    14
    15
    16
    17
    export class InMemoryDataService {
    createDb() {
    let heroes = [
    {id: 11, name: 'Mr. Nice'},
    {id: 12, name: 'Narco'},
    {id: 13, name: 'Bombasto'},
    {id: 14, name: 'Celeritas'},
    {id: 15, name: 'Magneta'},
    {id: 16, name: 'RubberMan'},
    {id: 17, name: 'Dynama'},
    {id: 18, name: 'Dr IQ'},
    {id: 19, name: 'Magma'},
    {id: 20, name: 'Tornado'}
    ];
    return {heroes};
    }
    }

    更多Http内容,查看[Http]章节.记住,in-memory-web api只在开发早期有用.

    英雄和Http

    目前HeroService代码实现:

    1
    2
    3
    getHeroes() {
    return Promise.resolve(HEROES);
    }

    我们返回一个模拟数据的promise解析数据,我们已经为使用Http客户端异步获取数据做好了准备:

    1
    2
    3
    4
    5
    6
    getHeroes(): Promise<Hero[]> {
    return this.http.get(this.heroesUrl)
    .toPromise()
    .then(response => response.json().data)
    .catch(this.handleError);
    }

    Http Promise

    我们仍然返回的是一个promise,但看上去有点复杂.

    Angular http.get 返回一个 RxJS的Observable. Observable是一个有效管理异步数据流的方式,稍后我们再详细讲解.

    现在,我们往下看,获取Observable之后使用.toPromise()操作符将它转换为Promise.但是Angular的Observable没有toPromise方法,我们需要从RxJS库里引入额外的扩展:

    import 'rxjs/add/operator/toPromise';

    解析数据并回调

    在promise的then回调里,调用Response的json方法解析数据,json目标有一个data属性,这个data属性里就是调用者想要的英雄数组,所以我们获取这个数组,并以解析的promise值返回.调用者还是和以前一样使用这个promise的英雄数据,它不需要关心这个值是怎么来的,或者从哪里来的.

    错误处理

    .catch(this.handleError); 抓取服务器的错误并将它传入错误处理器进行处理,这个处理函数非常关键!我们必须未雨绸缪:

    1
    2
    3
    4
    private handleError(error: any) {
    console.error('An error occurred', error);
    return Promise.reject(error.message || error);
    }

    在这个demo服务里,我们将错误放到控制台,真实应用里,需要设计好日志管理对错误进行记录.

    增加,编辑,删除

    我们很快有了新的需求,需要有增删改的功能.

    Post

    我们使用post方法来新增英雄.Post请求相比Get请求需要有更多的设置.

    1
    2
    3
    4
    5
    6
    7
    8
    9
    10
    11
    // Add new Hero
    private post(hero: Hero): Promise<Hero> {
    let headers = new Headers({
    'Content-Type': 'application/json'});

    return this.http
    .post(this.heroesUrl, JSON.stringify(hero), {headers: headers})
    .toPromise()
    .then(res => res.json().data)
    .catch(this.handleError);
    }

    Put

    put 是用来编辑一个指定英雄,但结构和post请求非常的相似.

    1
    2
    3
    4
    5
    6
    7
    8
    9
    10
    11
    12
    13
    // Update existing Hero
    private put(hero: Hero) {
    let headers = new Headers();
    headers.append('Content-Type', 'application/json');

    let url = `${this.heroesUrl}/${hero.id}`;

    return this.http
    .put(url, JSON.stringify(hero), {headers: headers})
    .toPromise()
    .then(() => hero)
    .catch(this.handleError);
    }

    Delete

    delete 用来删除英雄

    1
    2
    3
    4
    5
    6
    7
    8
    9
    10
    11
    delete(hero: Hero) {
    let headers = new Headers();
    headers.append('Content-Type', 'application/json');

    let url = `${this.heroesUrl}/${hero.id}`;

    return this.http
    .delete(url, headers)
    .toPromise()
    .catch(this.handleError);
    }

    Save

    我们将post和put方法组装成一个save方法,封装了逻辑(id存在就编辑,不存在就新增),让HeroDetailCompnent更加简洁.

    1
    2
    3
    4
    5
    6
    save(hero: Hero): Promise<Hero>  {
    if (hero.id) {
    return this.put(hero);
    }
    return this.post(hero);
    }

    现在我们的HeroService代码如下:

    1
    2
    3
    4
    5
    6
    7
    8
    9
    10
    11
    12
    13
    14
    15
    16
    17
    18
    19
    20
    21
    22
    23
    24
    25
    26
    27
    28
    29
    30
    31
    32
    33
    34
    35
    36
    37
    38
    39
    40
    41
    42
    43
    44
    45
    46
    47
    48
    49
    50
    51
    52
    53
    54
    55
    56
    57
    58
    59
    60
    61
    62
    63
    64
    65
    66
    67
    68
    69
    70
    71
    72
    73
    74
    75
    76
    import { Injectable }    from '@angular/core';
    import { Headers, Http } from '@angular/http';

    import 'rxjs/add/operator/toPromise';

    import { Hero } from './hero';

    @Injectable()
    export class HeroService {

    private heroesUrl = 'app/heroes'; // URL to web api

    constructor(private http: Http) { }

    getHeroes(): Promise<Hero[]> {
    return this.http.get(this.heroesUrl)
    .toPromise()
    .then(response => response.json().data)
    .catch(this.handleError);
    }

    getHero(id: number) {
    return this.getHeroes()
    .then(heroes => heroes.filter(hero => hero.id === id)[0]);
    }

    save(hero: Hero): Promise<Hero> {
    if (hero.id) {
    return this.put(hero);
    }
    return this.post(hero);
    }

    delete(hero: Hero) {
    let headers = new Headers();
    headers.append('Content-Type', 'application/json');

    let url = `${this.heroesUrl}/${hero.id}`;

    return this.http
    .delete(url, headers)
    .toPromise()
    .catch(this.handleError);
    }

    // Add new Hero
    private post(hero: Hero): Promise<Hero> {
    let headers = new Headers({
    'Content-Type': 'application/json'});

    return this.http
    .post(this.heroesUrl, JSON.stringify(hero), {headers: headers})
    .toPromise()
    .then(res => res.json().data)
    .catch(this.handleError);
    }

    // Update existing Hero
    private put(hero: Hero) {
    let headers = new Headers();
    headers.append('Content-Type', 'application/json');

    let url = `${this.heroesUrl}/${hero.id}`;

    return this.http
    .put(url, JSON.stringify(hero), {headers: headers})
    .toPromise()
    .then(() => hero)
    .catch(this.handleError);
    }

    private handleError(error: any) {
    console.error('An error occurred', error);
    return Promise.reject(error.message || error);
    }
    }

    更新组件

    现在HeroService已经可以满足增删改的要求了,我们需要更新下对应的组件,让它支持这些功能.首先引入这些方法.

    1
    2
    3
    4
    5
    6
    7
    import { Component, EventEmitter, Input, OnInit, Output } from '@angular/core';

    export class HeroDetailComponent implements OnInit {
    @Input() hero: Hero;
    @Output() close = new EventEmitter();
    error: any;
    navigated = false; // true if navigated here

    增加/编辑HeroDetailComponent

    我们已经有了HeroDetailComponent来查看指定英雄的详情.增加和编辑是详情视图的扩展,我们可以服用这个组件.原来这个组件是用于渲染一个存在的数据,现在我们需要考虑当对象为空时如何初始化hero属性.

    1
    2
    3
    4
    5
    6
    7
    8
    9
    10
    11
    ngOnInit() {
    if (this.routeParams.get('id') !== null) {
    let id = +this.routeParams.get('id');
    this.navigated = true;
    this.heroService.getHero(id)
    .then(hero => this.hero = hero);
    } else {
    this.navigated = false;
    this.hero = new Hero();
    }
    }

    为了区分新增还是编辑,我们通过检查url里的id参数是否存在来判断,如果id不存在,我们将HeroDetailComponent绑定到一个空的Hero对象,如果存在则将渲染这个存在的英雄.

    下一步是增加一个HeroDetailComponent方法:

    1
    2
    3
    4
    5
    6
    7
    8
    9
    save() {
    this.heroService
    .save(this.hero)
    .then(hero => {
    this.hero = hero; // saved hero, w/ id if new
    this.goBack(hero);
    })
    .catch(error => this.error = error); // TODO: Display error message
    }

    在保存英雄以后,通过goBack重定向到之前的页面.

    1
    2
    3
    4
    goBack(savedHero: Hero = null) {
    this.close.emit(savedHero);
    if (this.navigated) { window.history.back(); }
    }

    这里我们调用了emit,是为了通知我们刚刚增加或者修改了一个英雄. HeroesComponent监听这个通知信息,并自动刷新英雄列表.

    HeroesComponent里的增删

    用户可以通过点击按钮或者输入名字的方式新增英雄.

    当用户点击 Add New Hero 按钮,我们展示一个HeroDetailComponent.我们不导航到这个组件里,这样我们就不会获取到id参数,通过前面设计可知,这就表示创建一个空的英雄对象.

    增加以下的HTML到heroes.component.html:

    1
    2
    3
    4
    <button (click)="addHero()">Add New Hero</button>
    <div *ngIf="addingHero">
    <my-hero-detail (close)="close($event)"></my-hero-detail>
    </div>

    用户可以通过点击英雄名字下面的删除按钮来删除一个已存在的英雄.

    1
    <button class="delete-button" (click)="delete(hero, $event)">Delete</button>

    现在让我们来修改HeroesComponent让它可以支持增删行为.

    我们使用HeroDetailComponent来获取新的英雄嘻嘻,我们不得不导入并在directives数组里引用它的方式来告诉Aangular.

    1
    2
    3
    4
    5
    6
    7
    8
    import { HeroDetailComponent } from './hero-detail.component';

    @Component({
    selector: 'my-heroes',
    templateUrl: 'app/heroes.component.html',
    styleUrls: ['app/heroes.component.css'],
    directives: [HeroDetailComponent]
    })

    接着,我们事先增加英雄的点击按钮:

    1
    2
    3
    4
    5
    6
    7
    8
    9
    addHero() {
    this.addingHero = true;
    this.selectedHero = null;
    }

    close(savedHero: Hero) {
    this.addingHero = false;
    if (savedHero) { this.getHeroes(); }
    }

    删除的逻辑会稍微复杂点:

    1
    2
    3
    4
    5
    6
    7
    8
    9
    10
    delete(hero: Hero, event: any) {
    event.stopPropagation();
    this.heroService
    .delete(hero)
    .then(res => {
    this.heroes = this.heroes.filter(h => h !== hero);
    if (this.selectedHero === hero) { this.selectedHero = null; }
    })
    .catch(error => this.error = error); // TODO: Display error message
    }

    让我们来看看现在应用的效果:

    应用结构如下:

    1
    2
    3
    4
    5
    6
    7
    8
    9
    10
    11
    12
    13
    14
    15
    16
    17
    18
    19
    20
    21
    22
    23
    24
    25
    26
    27
    28
    29
    30
    31
    32
    33
    34
    35
    36
    37
    38
    39
    40
    41
    42
    43
    44
    45
    46
    47
    48
    49
    50
    51
    angular2-tour-of-heroes

    app

    --app.component.ts

    --component.css

    --dashboard.component.css

    --dashboard.component.html

    --dashboard.component.ts

    --hero.ts

    --hero-detail.component.css

    --hero-detail.component.html

    --hero-detail.component.ts

    --hero.service.ts

    --heroes.component.css

    --heroes.component.html

    --heroes.component.ts

    --main.ts

    --hero-data.service.ts

    node_modules ...

    typings ...

    index.html

    package.json

    styles.css

    sample.css

    systemjs.config.json

    tsconfig.json

    typings.json

    总结

    至此本教程结束了,代码打包.